Wednesday, 16 February 2011

Constructing the alloy wheels

I found a suitable wheel picture and applied it to a plane as a material. Using this as a reference I drew a tube with 15 segments and a cylinder with 10 segments in the centre (using snap toggle), so that I could create 5 spokes for the alloy. I then converted them both into editable polygons. Using attach I was then able to use bridge to join the cylinder to the tube.


Using turbo smooth rounded all the edges and allowed me to create a chamfer in the central line of each spoke. I adjusted the chamfer amount to match my reference picture. I repeated this for each spoke.


I created a simple wheel nut and used the array feature to rotate the nuts around the wheel. I used instance so that any modifications to the wheel nuts would be repeated on all of them.


To cut out holes for the wheel nuts I copied the wheel nuts and moved them away from the alloy.


I then used pro Boolean to cut them away......


......and moved the copied wheel nuts back into position, reducing them in size slightly so that there was a small gap around the wheel nuts

Aston martin DBS Progress

To construct the windscreen I have rotated a plane so that it is at a similar angle to windscreen on my reference picture and converted it to an editable polygon. I moved the vertices to match the reference image and used the "insert vertex" feature to add vertices around the windscreen to enable me to match the shape of the car more precisely.


I have used the turbo smooth modifier to create a smoother finish for the windscreen.


I have only made half of the windscreen, so that I can use the symmetry modifier to create an identical mirror of one side.

Using omni light

Using Omni Light, I have been able to make the pumpkin glow from inside.


I have adjusted the intensity and set the colour to orange to give the pumpkin a candle-like glow.


Using a target spotlight I have illuminated the scene. I set the colour to green and decreased the multiplier (to reduce the intensity).


By changing the sizes of the hotspot/beam and fall-off/field and adding some noise to the beam I created a misty effect.


Tuesday, 8 February 2011

Making Leaves Using Mapping Techniques


I selected the background of the leaf image, created a new layer, and then filled with black. I then deleted the layer that contained the image of the original leaf.


I created a new material from the original leaf image, which was the diffuse colour and then used the black and white image as the map for the opacity


To create a texture for the leaf I used the original leaf image and then set the bump to 140 using the close-up of the material to visualise how the finished result would look.


Using the soft selection in lines and verities I was able to distort the layers of the leaf to give them more depth.


I adjusted the hue and saturation of the original leaf image in Photoshop and was then able to use this map for the diffuse colour which enabled me to create different coloured leafs

Thursday, 3 February 2011

Modelling the Aston Martin DBS.

I searched online for suitable pictures to use on the reference planes that contained a front, back, top and side view. After saving it as a bitmap I could then transfer it to the material library, and transfer this to a plane. Using UVW Map modifier allowed me to move the actual bitmap around the plane, after selecting bitmap fit, and then selecting the gizmo drop-down. After the initial top view was created, I cloned the plane, rotated it and moved it into the centre. I then had to use the gizmo to move the correct part of the bitmap on to the plane. This process was repeated for the two remaining planes.


I started the modelling process with a cylinder; I increased the number of polygons to get a smoother radius. I converted it into an editable poly and removed all the edges with the edge selection so that it was a two dimensional circle. Using the border selection I selected the outer edge of the circle and, whilst holding down shift, used the scale tool to increase the polygons around the edge.


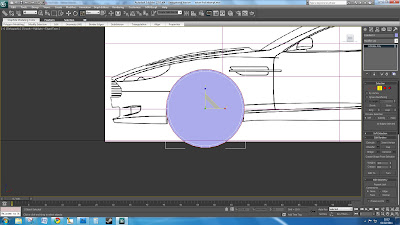
I selected the centre circle and the bottom polygons and deleted them. Using the line selection tool and the angle tool I could move lines to match the shape of the wheel arches.


Switching to the front view I could move the wheel arches accordingly on the Y axis


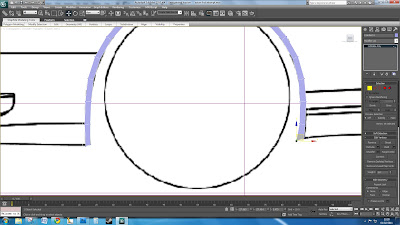
I repeated this process to trace around the entire car body. Selecting groups and individual lines, whilst holding down shift and dragging, creates more polygons to build up the car.


By changing the object's display properties to see-through, it is easier to trace around the bitmap.


By using the symmetry modifier only half of the car needs to be modelled.


Using the turbo smooth modifier increases the amount of polygons, which makes the model much smoother.


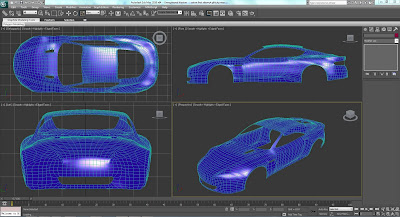
This is the mainbody work of the car.

My three main ideas for the animation

These are some scenes I would like to create for the project. I would like to give the impression that the scenes are all playing at the same time and cut back and forth to each one. I have put together some shots that I have taken from the film and some that I have found on the internet.


I want the first scene to feature Bond holding his silenced P99 sitting in the chair at Dryden's office in Prague. Bond will shoot Dryden in slow motion.


The second scene will feature Bond and Le Chiffre playing poker. I want to animate the cards being shuffled and a cocktail being poured.


I want to show the scene when Bond crashes his Aston Martin DBS when he has to swerve around Vesper, who lying in the middle of the road.


This is the scene where Bond crashes his car.

Lathe modifier & importing line drawings form Illustrator to 3DS Max

Using Illustrator I created an outline of half a chess piece using the pen tool. After saving this as an Illustrator 3 file I then imported it into 3ds Max and merged it with the background. It was then possible to move the axis to the centre of the chess piece and to use the lathe modifier to rotate the the chess piece around the axis.


This is the line drawing of the chess piece I made in Illustrator.


Completed chess piece